The indigoparadox Web Zone

OpenGL 1.0: Part 1

Back to tutorials

Web Zone Navigation

Related Web Zones

Other Web Zones

This page was generated from a source code file. Click here to download the file this page was generated from.
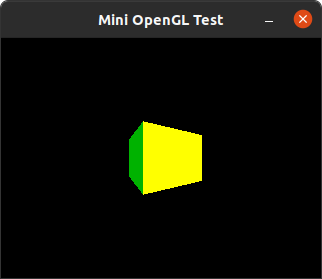
The inside of a colorful cube rendered in a window.

1. Introduction

This is an "anti-tutorial" for working with OpenGL 1.0. A working example is laid out below, along with the rationale for why certain things are implemented the way they are.

Please note that this may not be a good source for learning how to write *modern* OpenGL code. This is specifically a guide for writing code targeting older OpenGL implementations such as those found in early versions of Windows NT or older video game consoles.

2. Compiling

This source file also depends on the files below:

These files can be compiled together by adding them to your Borland or Visual C IDE. You may also compile them by installing the MingW compiler on your Linux distro (e.g. sudo apt install mingw-w64-i686-dev on recent Ubuntu) and using the command i686-w64-mingw32-gcc -o opengl01.exe opengl01.c oglwin.c oglpoly.c -lopengl32 -lgdi32 to produce opengl01.exe.

3. The Code: Preamble

Include The system OpenGL header for constants and functions used below. Also include mini.h, a header with some program-specific constants we'll also be using.

4. The Code: Setup Function

opengl01.c
1#include
2#include "mini.h"

A setup function to be called once from our wrapper program during initialization. This is C89, so all of the variables are declared up front!

opengl01.c
3int mini_opengl_setup() {
4 int retval = 0;
5 float aspect_ratio = 0;
6 float rzoom = 0;

Set the viewport to the size of the window. This is not strictly necessary in some implementations. However, some other implementations will behave weirdly if it's not done, so it's best to just always do it.

Reminder that the MINI_SCREEN_W and MINI_SCREEN_H constants are defined in mini.h!

opengl01.c
7 glViewport( 0, 0, MINI_SCREEN_W, MINI_SCREEN_H );

Calculate the aspect ratio of the screen as a float, which we will use to determine the properties of our frustum.

opengl01.c
8 aspect_ratio = MINI_SCREEN_W / MINI_SCREEN_H;

Change the state of the OpenGL machine so that further commands will affect the projection matrix. We are doing this now so that we can setup our projection!

opengl01.c
9 glMatrixMode( GL_PROJECTION );

Reset the matrix properties to defaults... We haven't done anything yet, so this will probably not do anything, but it's good hygiene.

opengl01.c
10 glLoadIdentity();

Setup the frustum... This distorts the lines drawn by the rasterizer, so that objects appear to have depth.

There are more complicated explanations regarding the math elsewhere, but the bottom line is that the smaller the rzoom variable is, the closer everything appears to the "camera," or point-of-view.

opengl01.c
11 rzoom = 1.0f;
12 glFrustum(
13 -1.0f * rzoom * aspect_ratio,
14 rzoom * aspect_ratio,
15 -1.0f * rzoom,
16 rzoom,
17 0.5f, 20.0f );

Change the state of the OpenGL machine back so that further commands will affect the model matrix, now that we've setup our projection above.

opengl01.c
18 glMatrixMode( GL_MODELVIEW );

Set the clear color. Here we've chosen a sensible default of black.

opengl01.c
19 glClearColor( 0, 0, 0, 0 );

Enable face culling.

opengl01.c
20 glEnable( GL_CULL_FACE );

Renormalize normals after irregular transformations. We're not scaling yet, and the normals specified in minicube.c are all 1.0f in length, so this probably isn't needed. But again, it's good hygiene.

opengl01.c
21 glEnable( GL_NORMALIZE );

Enable lighting. This turns on shading and lights, which can be seen in the mini_opengl_frame() function below. Without lighting, all polygons are rasterized flatly with the color specified by glColor3f().

opengl01.c
22 glEnable( GL_LIGHTING );

This allows colors specified by glColor3f() to work with lighting. If GL_COLOR_MATERIAL is not enabled but GL_LIGHTING is, all polygons will be dark gray.

opengl01.c
23 glEnable( GL_COLOR_MATERIAL );

This creates a separate buffer which you can think of as overlaying the framebuffer we're resterizing to. Each cell in this buffer contains a number representing the "depth" of, or distance from the camera to each polygon that's been resterized, as calculated based on their vertices.

Parts of polygons that are "farther" from the camera, "behind" other, already-drawn polygons, are then not drawn. This may seem elementary, but it must be enabled explicitly or polygons will overlap in strange ways!

The size of each "cell" in this depth buffer is determined in the platform-specific portion of initialization (e.g. oglwin.c or oglsdl.c).

opengl01.c
24 glEnable( GL_DEPTH_TEST );

And our standard cleanup code:

5. The Code: Frame Function

opengl01.c
25 return 0;
26}

A function to be called several times a second from our wrapper program to draw each frame on-screen before the wrapper flips the buffer.

opengl01.c
27int mini_opengl_frame() {
28 static int rotate_y = 0;
29 int retval = 0;

Clear the screen so we can draw a new frame. Note that we are clearing the color buffer (the visible framebuffer we have rasterized to in the previous frame), as well as the depth buffer we created when we enabled GL_DEPTH_TEST above in mini_opengl_setup().

opengl01.c
30 glClear( GL_COLOR_BUFFER_BIT | GL_DEPTH_BUFFER_BIT );

Create a new matrix frame which will be affected by further calls to e.g. glTranslatef() or glScalef(). We could also just call glLoadIdentity() on the current matrix frame, but pushing/popping is a good habit to get into, as it will make some trickier things we want to do later much simpler!

opengl01.c
31 glPushMatrix();

Move the "camera" back by three units and rotate the cube to the current angle defined by rotate_y.

Note that, while OpenGL is stateful in some respects, it does not "remember" objects between frames. Each object must be re-drawn and re-transformed for every frame!

opengl01.c
32 glTranslatef( 0, 0, -3.0f );
33 glRotatef( rotate_y, 0, 1.0f, 0 );

Enable light #0. There can be multiple lights with various options, but for now we'll stick with the default options of white, omnidirectional, and centered.

opengl01.c
34 glEnable( GL_LIGHT0 );

Increment the Y rotation of the cube for the next frame.

opengl01.c
35 rotate_y += 10;

Create the vertices for a multi-colored cube (see minicube.c for details).

opengl01.c
36 mini_cube();

Pop the matrix frame we created at the beginning of this frame.

opengl01.c
37 glPopMatrix();

Send all drawing commands to the screen!

opengl01.c
38 glFlush();

And our standard cleanup code:

opengl01.c
39 return 0;
40}

Table of Contents

  1. Introduction
  2. Compiling
  3. The Code: Preamble
  4. The Code: Setup Function
  5. The Code: Frame Function